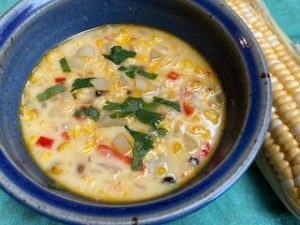
Summer Corn Chowder

The calendar says we’re still in spring for another month, but it’s full-on summer to me. Shorts, flip flops, and corn on the cob. There is nothing like a golden cob of corn with that sweet pop of flavor to bring me right back to a summer state of mind.

When I was a kid, we used to spend big chunks of June and July on my grandparents’ farm in Iowa. My grandpa would set up a propane burner at the edge of the sweet corn patch and heat up a huge pot of water. He would wait until it was boiling before picking the best ears. All of us cousins would peel that corn as quickly as we could so that it was cooked as fresh as possible.

Eating outside on the lawn next to their farmhouse, it didn’t matter that butter dripped down our chins and onto our already dirty t-shirts. Grandpa would turn on the garden hose and we’d all jump around the sprinkler until we were clean(ish) and happy.

I overdid it a little at the market this week and bought way too much corn, but it looked so delicious I couldn’t help myself. Soon I’ll write about the best ways to grill corn on the cob, but today I’ve got an overabundance of leftovers and I’m going to write about Summer Corn Chowder instead.

Chowder in the summer might sound kind of strange, but it works. It’s a one-pot meal that doesn’t require an oven, so it won’t heat up your kitchen. Once this soup is made and simmering, cleanup is quick. It is also a very flexible recipe. Add cooked and shredded chicken or crab, or even leftover bratwursts. Top it with fresh garden tomatoes, herbs or croutons. Any vegetable that is ready from your garden or that look especially delicious at the farmer’s market can be added. Use your imagination!

This recipe lends itself to many variations. I almost always add crisp, crumbled bacon on top. The smokiness of the bacon highlights the sweetness of the corn. For added richness, sprinkle shredded cheddar or jack cheese on top.

If I’m feeling especially spicy, I will mince up a jalapeno pepper and sauté it with the onion and bell pepper. Or perhaps substitute an Anaheim pepper for the bell pepper.


I like to use leftover grilled corn for this recipe, but it works well with fresh corn. If neither are available, go ahead and use canned or frozen corn. It won’t be the same, but it will get you close.

To cut the kernels off the cob without making a huge mess, I set a big bowl down into my kitchen sink with a wet dishrag underneath the bowl to keep it from slipping. I set the corn into the bowl with its pointy end up and use a sharp knife to cut the corn off of the cob. I angle the pointy end of the corn slightly towards me so that if the knife slips it won’t do me any damage. If the cob is a little slippy in the bowl, set a wet paper towel under it, it’ll keep it in place. If you are new to this technique, start slow, you’ll get the hang of it!

I like to keep this recipe simple. In the summer, I don’t want to be in the kitchen any more time than necessary. I’d rather spend be playing frisbee or lounging in my hammock with a good book.

This recipe lets the flavor of the corn really come through. The lime juice and white wine give it a lift and the milk gives it a creaminess without making it the heavier kind of chowder you might like in the winter. I hope you enjoy it.

Summer Corn Chowder

  • 6 ears of corn, grilled
  • 2 tablespoons butter
  • 1 medium onion, diced
  • 1 red bell pepper, diced
  • 1 tablespoon lime juice
  • ¼ cup white wine
  • 3 or 4 russet potatoes (about 1 pound), peeled and diced
  • 4 cups chicken or vegetable stock
  • 1 ½ cups milk (I use whole, but any kind will work)
  • chives or cilantro for garnish (optional)
  • salt and pepper to taste


Remove the kernels from the ears of corn.

In a large, heavy pot melt butter over medium heat. Add the corn, onion and bell pepper and cook for 5 minutes, stirring occasionally, until the onion starts to become translucent, about 5 minutes.

Add the lemon juice and white wine and deglaze the pan.

Add the potatoes and stock. Bring to a boil, then reduce the heat to a simmer and let it cook for 20 minutes until the potatoes are fork tender.

Remove from the heat and stir in the milk. Add salt and pepper until it’s just right.

Ladle into bowls and garnish with a sprinkling of chives or cilantro.

Enjoy!


Mango Salsa Recipe

It’s grilling season and here is one thing I’ve learned: when it comes to grilling, the sides you serve are as important as the main attraction.

One of my favorites is Mango Salsa. Sweet, a little spicy, and so colorful you’ll be singing that song from kindergarten about eating all of the colors of the rainbow.

This is fantastic as a dip with tortilla chips. The mango gives it a brighter note than tomatoes do in a standard salsa. It’s AMAZING on shrimp tacos and honestly, it’s great as a salad all by itself. A perfect vegan meal is this salsa with rice and black beans. You’ll never miss the meat. But try it on a turkey burger or spoon some over grilled salmon or ribs. The sweetness of the mango hits all the right notes against the smokiness of any grilled protein.

When peaches are in season substitute them for the mango. They won’t be as sweet, but they’ll be every bit as good.

I adapted my version from one I found at the National Mango Board (www.mango.org). The original recipe includes red bell pepper, but I find that green bell pepper gives a different flavor, so once in a while I go that direction.

The recipe below makes a small batch. I almost always triple it. I chop the pieces of mango larger if I’m planning on serving this salsa as a salad. If I want to eat it as a dip with tortilla chips I dice the mango much smaller.

Mango Salsa

  • 1 mango, diced small
  • 1/2 large bell pepper, diced small (green, red, orange, whatever color you like)
  • 1/4 cup diced red onion, diced small
  • 2 T lime juice
  • 2 T extra-virgin olive oil
  • 1 tsp. ground cumin
  • 1/2 tsp. of your favorite hot sauce (or more if you like it hot)
  • pinch sea salt
  • 2-3 T finely chopped cilantro

Combine the mango, bell pepper, and onion in bowl. Whisk lime juice, olive oil, ground cumin, hot sauce and salt in small bowl and stir into the salsa. Add chopped cilantro and stir until combined.

This is best served fresh, but it’ll be just fine a day or two later.

That’s it, folks, my favorite fruit salsa.

Enjoy!


Grilled Mini Hasselback Potatoes

Hi, I’m Ronda.

Welcome

Today, we’re going to talk about my new favorite way to make potatoes.

Grilled Mini Hasselback potatoes

Crispy and silky at the same time, these nuggets of deliciousness are easy to make once you know a trick or two. I’ll let you in on all of the secrets.

You will use small, new red or white potatoes for this recipe. No need to peel them, just give them a good soak or a scrub to make sure they’re clean.

A Hasselback potato looks like a book set on its spine with the pages fanned out. To achieve the cut, place your potato on a cutting board and place a wooden chop stick on either side of the potato. The chop stick will stop your knife from cutting all the way through the potato so that the slices will remain attached to the spine of your “potato book.”

(If you don’t have chopsticks, use bamboo skewers or the handles of wooden spoons. I once set two extra cutting boards on either side of the potatoes. It doesn’t matter, you just need something to stop you from cutting all the way through your spuds.)

Cut 1/4 to 1/8-inch vertical slices along the length of each potato. I find that if I rush this step, I get wonky cuts, so slow your roll and take your time.

If you can, soak your potatoes for a couple of hours in cold water with generous amount of salt and a splash of white vinegar. Your final product will be crispier because of it, but if you don’t have time for the soak, don’t let that stop you from making these spuds.

When you are ready to cook, place your hasselbacks on a sheet of aluminum foil, brush them with melted butter and sprinkle generously with salt. Cover your prepped potatoes with another sheet of aluminum foil and wrap it up to make a packet for the grill.

Place the potato packet on indirect heat on your grill for about an hour. Check them after about the 45 minutes by giving the packet a little squeeze (while wearing an oven mitt) to see if your potatoes are softening. When they are, move the packet to direct heat and remove the top piece of aluminum foil to let the pages of your potato booklets crisp up a bit. If you are feeling especially fancy, sprinkle a little grated parmesan or shredded cheddar on top for the last couple minutes of cooking.

(To speed up the grill time, microwave the prepared potatoes on high for 4 minutes. This will shorten cooking to about 25 minutes.)

What if it’s raining, or too hot to grill? No worries, bake them in the oven at 400 degrees F for 50 minutes to an hour. In that case, no need to wrap in aluminum foil, just put them on a baking sheet or in a shallow casserole dish.

Serve these beauties with sour cream or go whole hog and add some crumbled crispy bacon, shredded cheddar and chopped green onion for that loaded baked potato effect.

For those of you who like a recipe, here you go:

Grilled Mini Hasselback Potatoes

10 to 12 small new red potatoes, cut hasselback style
3 tablespoons butter
salt
white vinegar

Soak the prepared potatoes in cold, salted water with a splash of vinegar for a couple of hours. (If you don’t have time, skip this step.)

Place your hasselbacks on a sheet of aluminum foil, brush them well with melted butter and sprinkle generously with salt. Wrap the packet with another sheet of aluminum foil.

Place the potato packet on indirect heat on your grill for 45 minutes to an hour. When the potatoes are soft, move the packet to direct heat and remove the top piece of aluminum foil to let the pages of your potato booklets crisp up a bit. Top with grated or shredded cheese at this point if you wish.

Serve immediately with a sprinkling of parsley and wait for the compliments.

Give them a try, you’re going to love them!